As I started to record a bit more video, free space on my Synology DS918+ NAS was running out. I had some solutions in mind, but I figured I would at least add another HDD and expand the volume. Also - it gave me the chance to actually try hotswapping since I had never tried that on the DS918+ before and I was simply curious about how it would work.
Article Contents
More space!
I bought my Synology DS918+ NAS some years ago and lately I've noticed that free space was running out. I have started to record more videos and that requires a lot of space. This upgrade will just be on the smaller side and if I notice any problems one or 2 years from now, I will buy a whole new setup instead that better suits my needs. But since I don't know how my situation will look next year, this small upgrade will do for now.
At first I just wanted to expand with another 3TB, but I found some 4TB NAS HDDs for cheap and bought 4 of them. 4x4TB in a RAID5 is still not that much space, but it will suffice for now. My biggest issue is that I don't move raw footage to external drives or basically clean the folders of bad footage as so if I start doing that I could probably wait with this update for another year at least.
Total storage space before and after the upgrade can be found below. Keep in mind that 3TB drives have ~2.73 TB actual space and 4TB drives have ~3.64 TB actual space. In a RAID5 configuration that means:
(2.73 * 3) - 2.73 ≈ 5.5TB (before)
(3.64 * 4) - 3.64 ≈ 10.9TB (after)
This is obviously just a quick calculation and Synology has a handy raid calculator that could be useful if you are unsure of the calculations and want to experiment with different configurations before committing to a RAID option or buying HDDs for upgrades.
Anyway, what this all ends up with is double the space on the NAS, but also 3x3TB former NAS drives that I will use for offline and offsite backup. I think I will probably have enough space for a while.
Swap drives
The idea was to swap the drives one by one and repair the volume between each swap. I could have done a few other things as well but eventually opted for this method because it was easy and I could work with the NAS (a bit slower though) while the repair-process was running. Other options included using the empty slot for new drives and copying the drives and later replacing them, or simply copying everything to whatever external storage I have and just replacing all drives at the same time while the NAS was shut down and creating a new volume when rebooting.
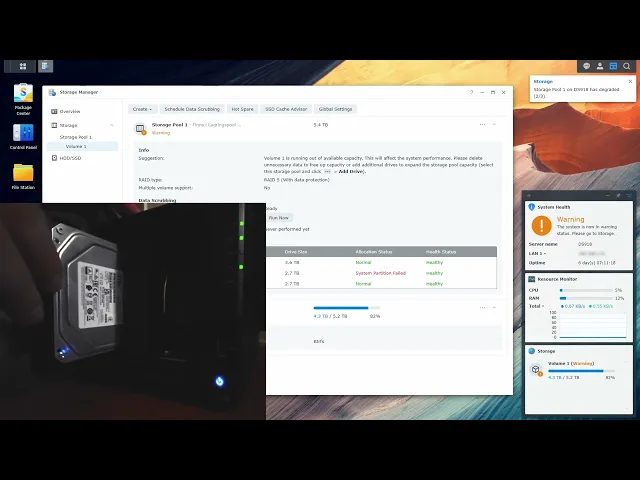
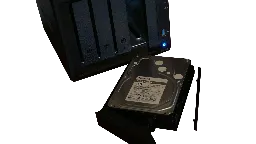
The DS918+ supports hotswap, so the actual swapping of drives is really easy. Simply remove the drive and replace it with the new one. My volume is configured in a RAID 5 so I can remove one drive at a time and rebuild between the swaps. The DSM will inform you of all this and detect the new drive automatically, but there are some manual steps that need to be done in order to start the repair process.
Directly after the first drive was removed:
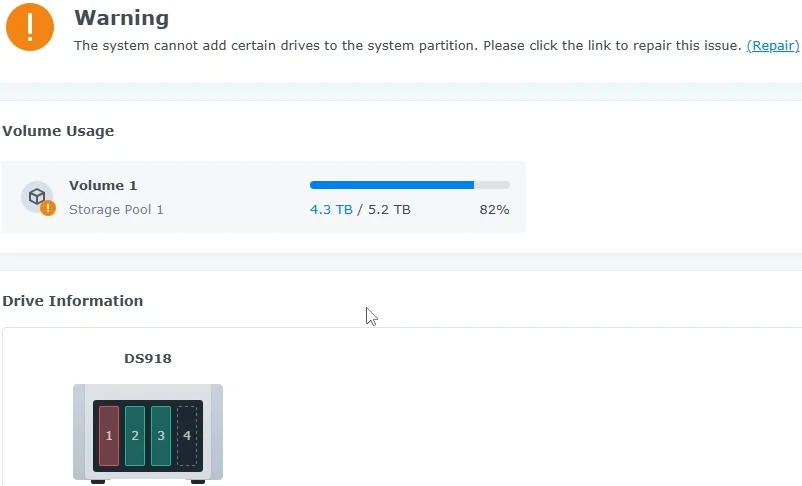
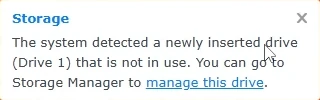
Moments after, this showed up:
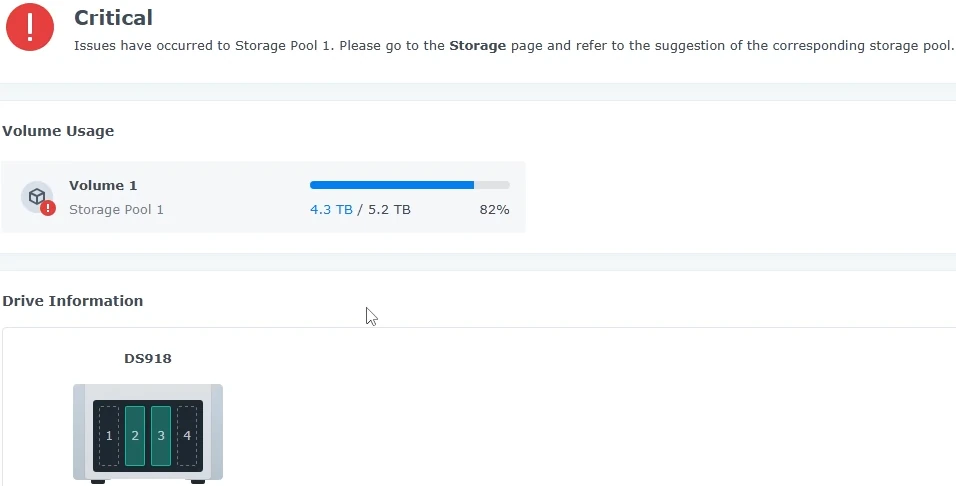
I inserted the new drive in slot 1 and got this popup:
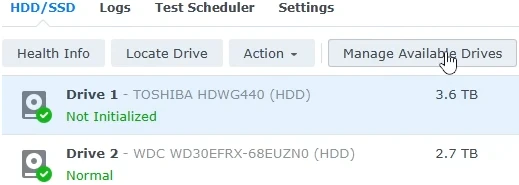
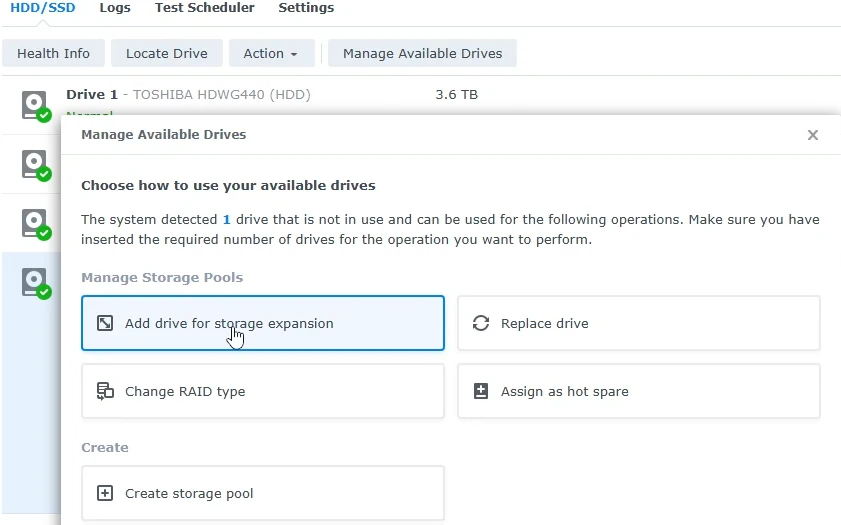
After a bit of initial confusion I found the correct tab and the "Manage Available Drives" button:
I selected "Repair storage pool":

I then selected the storage pool (I only have one):

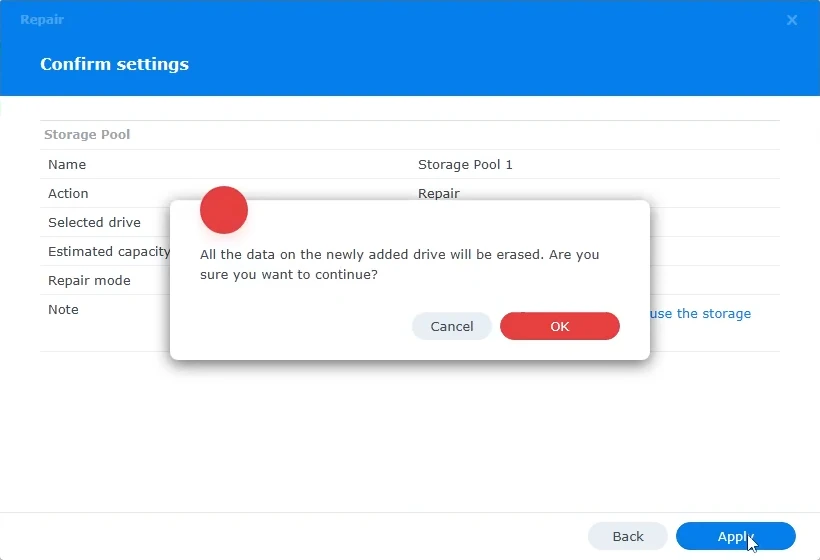
Then confirmed the settings and clicked OK on the final warning about that the drive was about to be erased:
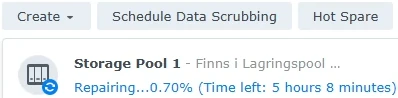
Then I just sat back and let the NAS do it's thing:
During the final swap, I noticed that the volume was automatically expanded to use all available space on the 3 new 4TB drives without me having to do anything. The NAS simply took it's time, but eventually the new volume was fully active.
Add one more drive
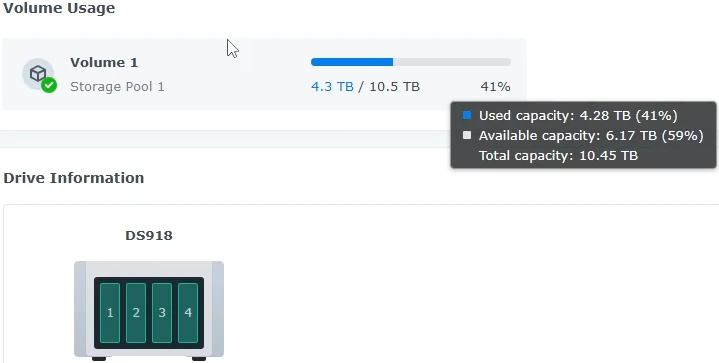
This was a really simple step, but took a while to process. I bought 4x4TB drives, so obviously I added the new drive to the final (previously empty) slot as well. The NAS automatically detected this new drive and with a few clicks, the process of expanding the RAID 5 volume to all 4 drives was on its way. I also had a few other options, but opted for simply expanding my RAID 5 to all 4 drives and that gave me a total capacity of 10.45TB.
Select the new drive, click "Manage Available Drives" and "Add drive for storage expansion":
There were a few more steps, but they were all pretty similar to the ones during the swap above. Then I just had to wait for quite some time while the NAS did its thing:

And that's it - everything done:
Looking back, I should have tried the "copy to drive, then replace" option at least once to test it since I had a free slot anyway. Another thing was possibly to look into the different settings and if I could have made the process faster, but honestly - I was not too bothered with that since I was not in a rush.
Overall I have to say that Synology has made the process very easy. At first I recorded just in case anything went wrong, but nothing did. The DS918+ detected all changes automatically and even if I was a bit confused at times as to WHERE I had to click, after I found the correct tab and button - everything was quite obvious. Yup - it took some time, but it was really easy.
Step by step video
Even though the process was really easy, I thought it could be useful to record the whole thing and upload it to my YouTube channel. It's simply a recording of the actual NAS where I swap the drives and also a screen recording of the Synology DSM that reacts to the changes and what buttons I had to push. Hope it helps someone!